|
|
Post by trehopr1 on Oct 2, 2018 21:53:03 GMT
The "spreading" of small Lepidoptera has always been a difficult facet of the "preparation phase" of collecting. The truth is that it first of all takes a steady hand as well as a sharp eye (in general) to work with such small and delicate things. Secondly, a method needs to be devised and implemented "preferably" while the specimens are still fresh and limp. Too often collectors either paper the specimens right away and they dry out (which simply confounds the process of spreading ten fold) or they do not have an improvised system in place to do a good job while still fresh. They instead fall back on methods that work on their larger leps. Simply put: some of the traditional methods for spreading larger lepidoptera just don't work as well for smaller leps under 30mm. in wing expanse. Now, what I am about to show is "my" preferred method for dealing with these small fry. I have over time tried different approaches and as of late I have found this to have the highest percentage of success. This method or style is non-invasive to the wings (meaning no pin holes or scratches from pins). Secondly, there should never be any breakage of antennae as the specimens are fresh. I want to reiterate once again we are dealing with "fresh caught" specimens.... nothing dried out. The size range here we are talking about is Lycaenidae, small pierids (Eurema), and some smaller Nymphalidae (Phyciodes) etc. etc. No microlepidoptera in this discussion! So, it's like this when I go field collecting. When I secure one of these small fry I put it in a jar separate from all larger things. Most times I will carry 4 or 5 smallish jars to house each specimen. I will then bring them home alive for dispatch and immediate work. However, what I have also done is taken a kill bottle and only charged it with 3-4 drops of Ethyl acetate. That is enough to knock them down but, not necessarily kill them. The idea here is to immobilize them but, your still leaving their body functions working so that they stay fresh. If you make the mistake of charging the jar "as always"; your small fry will "lock up" before you ever get home and then you might as well be dealing with a dried out specimen. Upon your arrival at home your work must begin. I prefer using either size #1 or size #0 pins for all Lepidoptera in this size range. I absolutely never "pinch" things of this size. I only "knock them down" in the kill bottle. Shortly, thereafter you are basically putting a stake through their heart so they won't be coming back. Below, is how your specimen should look after it has been pinned and placed on "a level plane" on the spreading board. The central pin should always go in as straight as an arrow so that the wings maintain an even keel or balance. 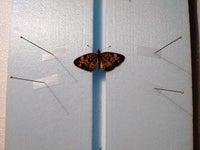 Off to each side of the butterfly you will see 4 small "holding strips" for the wings. Each is pinned with a size 1 or size 0 pin. Nothing larger. The strips have been cut from a typical glassine butterfly envelope. This is now where the "steady hand and sharp eye" part begin. Each pinned holding strip is taken one at a time in one hand; while in the other hand a size 1 pin is deftly held. Using my #1 pin I gently "lift" the trailing edge of the left forewing and at the same time begin to carefully apply a gentle "pushing"pressure to the whole of the wing which should cause it to move upward in a smooth effortless movement. When it looks as though the wing is slightly higher than perpendicular I carefully place the "holding strip" in place over the corner of the wing. As illustrated in figure 2. |
|
|
|
Post by trehopr1 on Oct 2, 2018 21:57:56 GMT
Figure 2.  With my first wing in a "holding pattern" so to speak; I then proceed to the other forewing and repeat the same process. No pin holes in the wing, no scale loss, and no scratches due to veins being pushed upon by pins! |
|
|
|
Post by trehopr1 on Oct 2, 2018 22:03:55 GMT
At this time it seems that attachment space has been used up; so I will have to continue with my lesson at a later time when space becomes available.
|
|
|
|
Post by trehopr1 on Oct 9, 2018 4:08:42 GMT
 Here, we now see that the opposing movement which I made to the right forewing has been successful. Each forewing is now held in place by a holding strip and associated pin. The trailing edge of each forewing is also raised slightly above the perpendicular line. At this time, I straighten the head if necessary and then I take the liberty of "stationing" the antennae in a pleasing natural position. Using this approach you have effectively finished the top half of your specimen; thus you are not doing the "reach around" later to tease in place the head and antennae. |
|
|
|
Post by trehopr1 on Oct 9, 2018 4:42:42 GMT
The next step is to now raise the left hindwing to a pleasing natural position. Since, your specimen is fresh the hind wings should move smoothly and with little effort. To do this, I once again "gingerly" slip my #1 pin under the hind wing at one or 2 points (depending on the wing shape or angles). A little gentle pressure should move the "whole of the wing" smoothly upward; with your free hand you place another pinned "holding strip" on the wing (as seen in the photo below).  On this particular Phyciodes I placed my "movement pin" under the upper corner of the hind wing. As I lifted it slightly the wing moved upward effortlessly. I then placed my holding strip. This process is again repeated for the right hind wing. |
|
|
|
Post by trehopr1 on Oct 9, 2018 5:36:00 GMT
So, now it is here that you see the culmination of our efforts thus far.  Our specimen's wings are now held fast in place (and symmetrical). I will now use 1 or 2 pins to support or brace the abdomen so that it does not droop or "tweek" to the (left or right) as it dries. Once the abdomen has been braced; I then lay a 2 inch long (previously cut) strip "gingerly" over the holding strips (of each side) and (at a 45 degree angle). I then pin the ends of each of these overlay strips down so they are taut. A proper "curing" period of about a month will ensure your specimen will come off the board flat winged (and stay that way). Using this process you will have gorgeous examples of smaller Lepidoptera free of pin holes, scratches, or rubs from strips. I have had a lot of success over these last 4 years with this method; having acquired just over 60 specimens of various small Lepidoptera which I otherwise would not likely have. And they are all spot on beautiful ! My percent of success is 90% butterflies, 80% moths (some still remain tough), and 50-60% on skippers (whose muscles still make them stubborn subjects). |
|
|
|
Post by trehopr1 on Oct 9, 2018 5:48:57 GMT
In closing, while I don't expect this method will change any seasoned collectors personal techniques; it does provide a "tangible" beginning point for novices. A means of learning to work with smaller things and not find the task so daunting. The dissemination of knowledge is my sole purpose here.
If this gift broadens the minds of beginners or even gives pause to re-think old methods; then I have succeeded admirably.
|
|
chrisw
Junior Aurelian

Posts: 58
Country: USA
|
Post by chrisw on Oct 11, 2018 20:13:46 GMT
Thanks for sharing that method trehopr1. I have butchered many smaller leps over time. I will have to try this method next season.
|
|
|
|
Post by rayray on Oct 13, 2018 22:00:33 GMT
Seems straightforward for the forwings and getting them down and set without holes, but I still se issues with the hindwings "popping out" which will be further complicated by the forewings being fastened tight to the board by spreading paper and the hindwings will resist being "tucked" again and will likely fold or refuse to sit flat without using pins to retuck the HW.
That is why I usually move the FW's up halfway, then the hindwings halfway, and then repeat again which places them in the proper position of your final specimen. I still don't know how to reliably set a specimen in any "quick" amount of time without putting a pin temporarily in the hindwings to prevent them from falling back down or popping out.
This is especially true of skippers and moths with weak HW veins where the only way to hold the wings down is a heavily angled pin or spreading paper. And if you use the latter, the paper only gets in the way of hindwing manipulation and you end up poking holes anyway!
|
|
|
|
Post by trehopr1 on Oct 13, 2018 22:41:55 GMT
Seems straightforward for the forwings and getting them down and set without holes, but I still se issues with the hindwings "popping out" which will be further complicated by the forewings being fastened tight to the board by spreading paper and the hindwings will resist being "tucked" again and will likely fold or refuse to sit flat without using pins to retuck the HW. That is why I usually move the FW's up halfway, then the hindwings halfway, and then repeat again which places them in the proper position of your final specimen. I still don't know how to reliably set a specimen in any "quick" amount of time without putting a pin temporarily in the hindwings to prevent them from falling back down or popping out. This is especially true of skippers and moths with weak HW veins where the only way to hold the wings down is a heavily angled pin or spreading paper. And if you use the latter, the paper only gets in the way of hindwing manipulation and you end up poking holes anyway! Thank you rayray for your suggestion of how you approach the movement of the wings. It will offer anyone reading this yet, another approach or option for moving the wings. As you mentioned, species with weak hind wing veins or those with powerful thoracic muscles (skippers); will likely cause problems with setting. I have noted in my last post that indeed some moths (about 20%) and skippers (about 40%); still remain elusive for me to get any good specimens of. So, this method I've illustrated is not necessarily fool proof; however, I feel the method does seem to work well over the vast majority of butterflies (90% success) I've tested it on as well as a high percentage of moths (80% success). I do hope that others who have longed to have nice specimens of some of the smaller stuff will at least try my approach and see if it works for them. If in the process they "tweak" my method to suit themselves in some way and it works then I have at least shown them a tangible path to follow.... I can say that for a long time I never collected much of anything smaller than say a "larger" cutworm moth. I tried different approaches early on with much frustration and limited success. So, I gave up basically collecting the small stuff to pursue the larger quarry. Then 25 years down the road later I decided to have another crack at the many things which I had been passing up all those years. There are still many cold weather moths out there to be had and they are still arriving here and there at my porch light. Catch a few of them to practice on and just make sure you prepare them up while fresh. Then give it a go next season and perhaps be all the wiser when you catch that really great looking tiny Lycaenid, Pierid, or what have you. |
|
|
|
Post by louisianacurmudgeon on Oct 19, 2018 17:48:09 GMT
About 4 years ago I published a 2-page article how to overcome problems associated with processing, spreading all macro and micro insects. Titles 'How to eliminate drying in delayed processing and spreading of lepidoptera specimens'. For about 40 years I have used these simple humid relaxing chambers along with the chemical 'chlorocresol' to transport and temporarily store field collected insect specimens of all orders prior to pinning or spreading them, and doing so in pristine condition. I normally have dozens of such containers in continual use at any given time to prevent drying of specimens. This allows me to remove specimens from the previous days or nights of dispatched specimens in various traps, e.g., light traps, pheromone traps, bait traps, pitfall traps, flight traps, etc., and process them at a later time, hours, days or even weeks later all the while remaining fresh and pliable as if they were collected only minutes earlier. I will post both pages here as jpgs. Attachments:
|
|
|
|
Post by louisianacurmudgeon on Oct 19, 2018 17:49:17 GMT
page 2 of my 2014 published article. Attachments:
|
|
|
|
Post by louisianacurmudgeon on Oct 19, 2018 18:12:06 GMT
Continuing my discussion about processing small lepidoptera. The attached jpg illustrates several hundred very small lepidoptera (Sesiidae) that I just spread in the past two days (10-17 and 10-18). These specimens were captured and remained in the traps in the field about a month, between September 10 to October 8. The captures from 65 pheromone traps on a tree farm and were picked up on October 9, and transported by vehicle 350 miles back to home. This particular month's sample amounted to 394 adult sesiidae along with numerous dozens of bycatch lepidoptera, coleoptera, and several other orders of insects. Over the past 10 days, I have been processing, spreading and labeling this material. Despite these hundreds of specimens being originally captured some as long as 6 weeks ago, I simply take them from the containers and spread them without difficulty, and without any other special preparations. I have processed well over 50,000 adult specimens of sesiidae using this method over the past 40 years.
|
|
|
|
Post by trehopr1 on Oct 19, 2018 23:58:35 GMT
Thank you for your insight and articles concerning the use of Chlorocresol in keeping specimens fresh for an extended period. I thought of using it years ago but, never proceeded with the idea as small fry were never a priority of mine. Now, I tend to keep my capture numbers small (ten or less) at any one time so I can take my time working with them. I have good results now that I work them up when fresh.
Yours is certainly an innovative process which others should consider if small fry are mostly what you enjoy collecting.
|
|
|
|
Post by louisianacurmudgeon on Oct 20, 2018 1:38:58 GMT
My chlorocresol method works for all insects of all orders, large specimens or tiny specimens. For example, I have personally collected over 200,000 Sphingidae in Louisiana, and equivalent quantities of saturnids, the largest of moths, and my methods are superior to any and all others you will ever encounter anywhere. If I had only one word to describe it that word would be 'magical'. I had to develop this method because I usually operate a large number of insect traps of all types. e.g. this year I am operating 115 trap 24 hours of every day Jan 1 to December 31.
|
|


